Update: It looks like Variable VVV is currently not working with Varying Vagrant Vagrants 2.0.0 as of (10/11/17). But fear not. There are a few other options for automating your VVV builds. Including VVV-Base which works wonders.
Vagrant bills itself as “Development environments made easy.” But tell the average user they need to set everything up using Terminal and they immediately start picturing this:

Terminal doesn’t have to be this intimidating though. We’ll go through the steps and tools needed to get you up and running on a Vagrant powered WordPress development environment.
The Tools
VirtualBox – We’ll be using VirtualBox to run our development servers on our local machine. Mostly because it’s free. Although Vagrant does support several other providers.
Vagrant – I mean, obviously.
Varying Vagrant Vagrants – This is an open source Vagrant configuration focused on WordPress. Installing this will get us set up with several local WordPress instances off the bat.
Homebrew – We’ll need this to install the next item.
Variable VVV – This let’s us run a terminal command to start a prompt to walk us through spinning up a new WordPress site. And has more advanced features to spin up installs with plugins and themes already included. We won’t be getting into that in this guide.
Vagrant Manager – This gives us a gui for our Vagrant machines. It makes it much easier to keep track of which machines are up.
VVV Dashboard – This gives us a dashboard interface for our Varying Vagrant Vagrants setup which allows us to easily jump to our sites in browser.
Installing VirtualBox and Vagrant
The first thing you’ll need to do is download and install VirtualBox1 Then you’ll want to download and install the Vagrant package. At this point you could start spinning up your own servers with Vagrant, but we won’t get into that.
Setting up Varying Vagrant Vagrants
This is where we’ll have to start busting out Terminal to install a few Vagrant plugins2.
We’ll install the Vagrant host updater which makes it a bit easier to start up virtual machines, and the Vagrant triggers which lets us fire various scripts. These are optional items. If you want some more info on them check out the Varying Vagrant Vagrants setup guide.
To install the Vagrant host updater you’ll want to type vagrant plugin install vagrant-hostsupdater into Terminal and hit enter. Wait a few second and you’ll get a confirmation that the plugin was installed.
Repeat this process with the command vagrant plugin install vagrant-triggers . Wait a second and you’ll get a confirmation. Now you’ve installed two Vagrant plugins. Easy enough.
Next we’ll need to clone the Varying Vagrant Vagrants repo into a local directory on our machine. I dropped mine in my Sites folder by first cd’ing into the Sites folder with cd ~/sites . Then to clone the repo you’ll just need to run git clone git://github.com/Varying-Vagrant-Vagrants/VVV.git vagrant-local from that directory to install VVV into /sites/vagrant-local. Then sit back and grab a beer and wait. Although keep an eye on it as you may have to enter your user password. This process tends to take a bit with the longest step being “installing npm for the first time”. Just let it run.
Once everything is done you’ll have several WordPress dev sites set up. Go ahead and check them out here:
- http://local.wordpress.dev/ for WordPress stable
- http://local.wordpress-trunk.dev/ for WordPress trunk
- http://src.wordpress-develop.dev/ for trunk WordPress development files
- http://build.wordpress-develop.dev/ for the version of those development files built with Grunt
- http://vvv.dev/ for a default dashboard containing several useful tools
- (From Varying Vagrant Vagrants)
Setting up Variable VVV for easy creating of new WordPress sites
First you’ll want to install Homebrew if you don’t already have it. Just to keep the setup of Variable VVV extra simple. To do that you’ll just need to run ruby -e “$(curl -fsSL https://raw.githubusercontent.com/Homebrew/install/master/install)” in Terminal.
Once that is done installing we’ll be able to use the command brew install bradp/vv/vv to install Variable VVV.
Now we should be able to run vv create from any directory in Terminal to create a new WordPress install. Give it a shot.
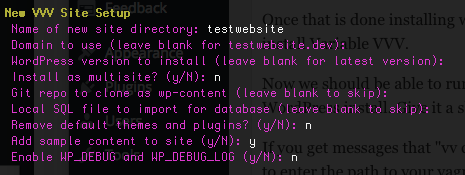 If you get messages that “vv couldn’t find a config file, so we will create one now,” you’ll need to enter the path to your vagrant-local folder. If you followed the steps above that would be /Users/ComputerUserName/sites/vagrant-local.
If you have issues with this there are commands to set the path in Variable VVV using vv -path /pathname , or you can find the .vv-config file in your user folder and edit it there. You’ll need to be showing hidden files to see this in finder.
Otherwise you’ll get the questions above. Fill them out and wait for Variable VVV will set up a new WordPress install with you using whatever settings you provided. Once it’s done, you should be able to access your WordPress install at the domain you chose.
Adding Some Extras
Just doing the above is good enough to get you going on a WordPress development environment powered by Vagrant, but we want to add a few more frills.
Let’s add Vagrant Manager to give us a nice user interface to control our machines and see which are running or halted from our menu bar.
To install Vagrant Manager, just download the most recent .dmg from the releases page and install as you would any other app downloaded from the web. Once it’s installed open the app and you’re all set up. You should see “V” in your menu bar.
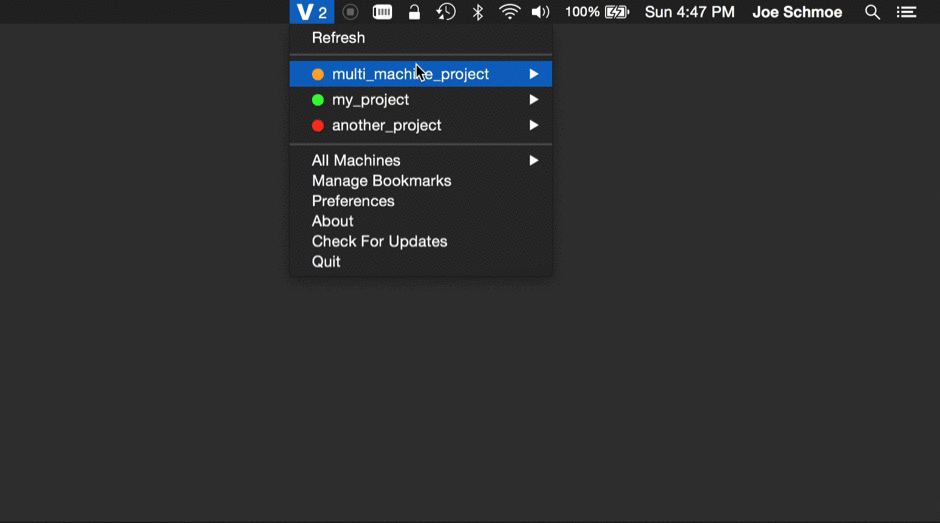
If OSX doesn’t want to open the app because it’s not from a verified developer you’ll have to open the Settings app, select Security & Privacy, and there should be a note giving you the option to “Open anyway”.
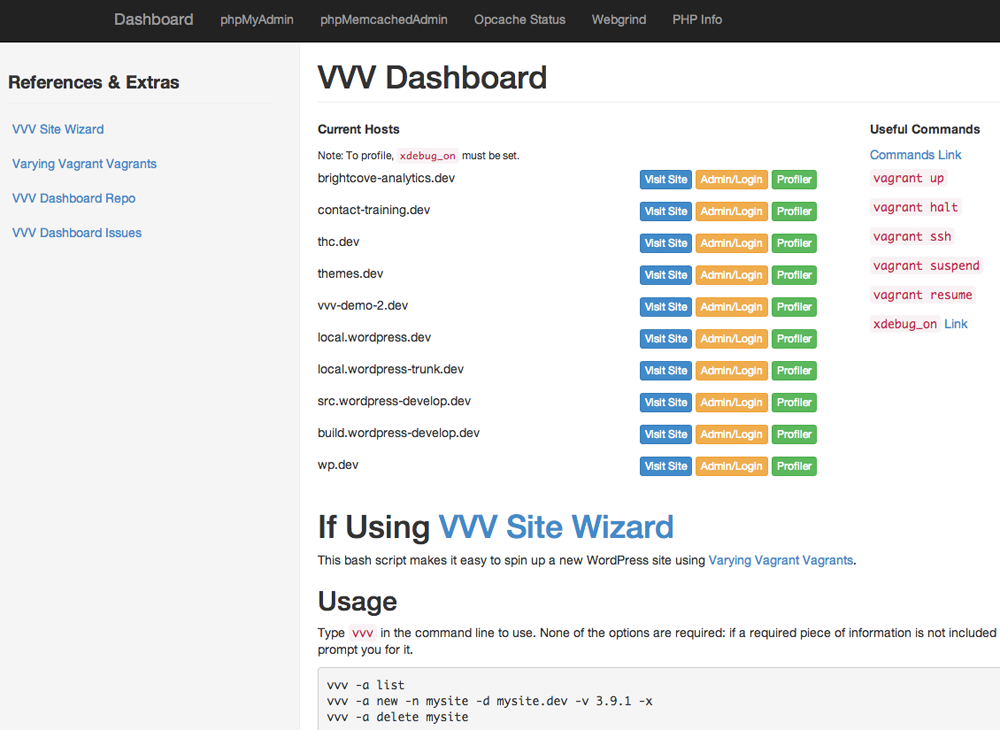 The last item we’ll set up is the VVV Dashboard. All this does is clean up the dashboard which can be found by going to vvv.dev in your browser and makes it a little more useful.
To install, you’ll first want to cd into the www folder of your VVV install. If you’ve been following along cd ~/sites/vagrant-local/www should get you there. Once in that directory you’ll want to copy the VVV Dashboard repo into the folder using git clone https://github.com/topdown/VVV-Dashboard.git dashboard . When that’s done you’ll just need to copy over a couple files to new locations. Those would be:
- Copy the dashboard-custom.php to vagrant-local/www/default/dashboard-custom.php
- Copy the style.css to vagrant-local/www/default/style.css
Now if you go back to vvv.dev in your browser you should have a nice dashboard with links to each site and their login screens3.
That’s it. You should be up and running a development environment using Vagrant. Now you can use Vagrant Manager to Halt and Start your local Vagrant machines, and use the command vv create to spin up a new WordPress install.
If you’ve got any questions or comments let me know below.
- If you don’t already have it setup.
- Optionally.
- I doubt the login link works if you’re not using /wp-admin. I have not tested that yet.
