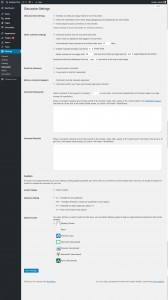
Discussion Settings
 Next let’s discuss the Discussion Settings1.
The Discussion Settings are all about allowing users to interact with your blog by either commenting or pinging your site. Let’s break down the settings section by section.
Default Article Settings
- Attempt to notify any blogs linked to from the article – This setting controls your blog sending out pings to other sites letting them know you used one of their links within your post. If you’ve got an article with hundreds of links, this setting could slow down your posting process as WordPress attempts to contact all of those links during the publishing process.
- Allow link notifications from other blogs (pingbacks and trackbacks) on new articles – Checking this allows for your site to accept ping backs and trackbacks from other WordPress users. Any ping backs or trackbacks can then show in your comments section for the post.
- Allow people to post comments on new articles – This setting will disable comments for any future articles posted. However, you can still edit to allow or disallow comments per each individual post. Used in conjunction with the option to close posts after a certain number of days can help you fully disable comments on your site.
Other Comment Settings
- Comment author must fill out name and email – The home security system sign in the yard of the house that doesn’t have a home security defense of spam. This setting requires a name and email to be entered prior to commenting, but there is no verification to check if the name or email are legitimate. Still it can slow down some spammer bots.
- Users must be registered and logged in to comment – A little more security to protect against comment spam. This requires users be registered to comment on your posts. You’ll want to allow anyone to register if you’re using this setting.
- Automatically close comments on articles older than [X] days – Setting this closes the comments on posts older than a given number of days. If set this to 1 day and disallow people to post comments on new articles, you’ll essentially disable all commenting on your site.
- Enable threaded (nested) comments [X] levels deep – This allows for nested comments to a given number [X] of levels. Think of this as replies to a main comment. Typically these are indented up to a point and then continue down inline.
- Break comments into pages with [X] top level comments per page and the [last/first] page displayed by default. Comments should be displayed with the [older/newer] comments at the top of each page – This setting allows pagination for your comment section as well as giving you some control as to how the comments are ordered. This is very handy if you’re getting tons of comments. As loading all comments on one page can eat up a lot of load time.
Email Me Whenever
- Anyone posts a comment – Enabling this will cause WordPress to send an email to the admin email from Settings > General any time a new comment is made on your site.
- A comment is held for moderation – Likewise you can have WordPress email you anytime a comment is held for moderation and needs to be approved.
Before a comment appears
- Comment must be manually approved – Setting this will cause all comments made to the site to need to be moderated and approved by an administrator before they are posted to the site.
- Comment author must have a previously approved comment – This setting allows for comments to be approved if they have a previously approved comment from the same email address.
Comment Moderation
- Hold a comment in the queue if it contains [X] or more links – Setting this will cause any comments with more than a given number [X] of links to be held for moderation. Typically spam features multiple links. This can help you prevent spam from showing on your site.
- When a comment contains any of these words in its content, name, URL, e-mail, or IP, it will be held in the moderation queue. One word or IP per line. It will match inside words, so “press” will match “WordPress” – The longest setting name ever. This section allows you to add words, IPs, emails, and more to a list that will be used to check comments against to determine if they should be held for moderation.
- When a comment contains any of these words in its content, name, URL, email, or IP, it will be put in the trash. One word or IP per line. It will match inside words, so “press” will match “WordPress”. – Much like the last setting except this time they comment goes straight into the garbage.
Avatars
No, not the James Cameron epic 3D adventure, but the previously mentioned Gravatar image that can be tied to a user’s email address. This section allows for a few settings on how avatars are displayed within your comments section.
- Avatar Display – Checked shows avatars in comments. Unchecked does not.
- Maximum Rating – This allows you to set the rating limit allowed for avatars that will display on your site. This can help prevent showing avatars that are inappropriate.
- Default Avatar – This setting allows you to select a default image to use if a user does not have a Gravatar image set.
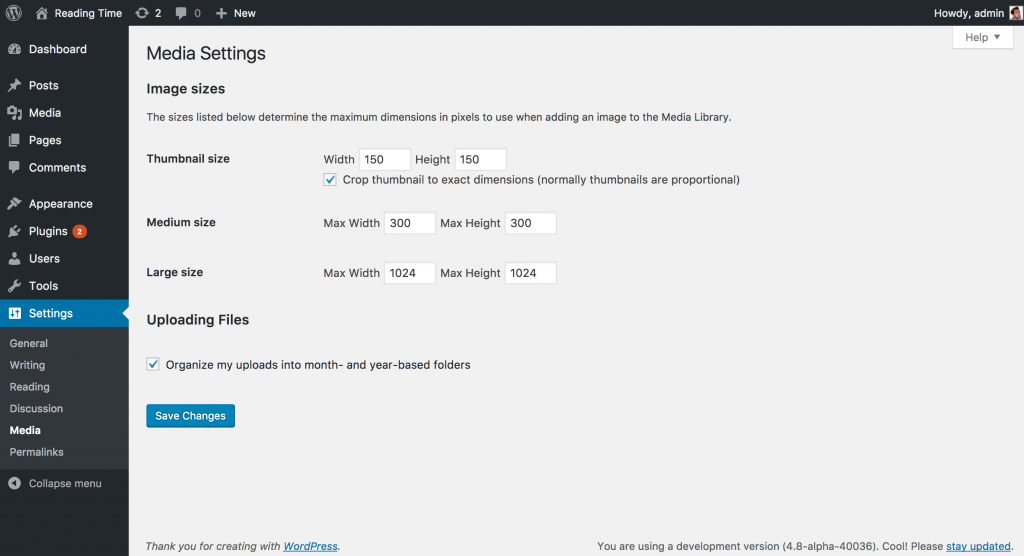
Media Settings
Out of the box WordPress will crop images you upload to a few sizes, if the image is larger than those dimensions to begin with. These are the image sizes you can choose when inserting an image into a post. The Media Settings screen allows you to adjust those default sizes to better fit your site’s needs.
The three sizes are thumbnail, medium, and large. The main difference being that thumbnail can be cropped to exact dimensions, whereas medium and large take a max-width and max-height. For example, if you were to upload an image at 1280 x 600 it would crop the large size to 1024 x 480 and the medium size to 300 x 141.
With the addition of responsive images in WordPress 4.4, a medium-large size was added with a 768px width by default and no height limit. It cannot be edited within the Media Settings page though. In order to edit the size for it you would need to use the update_option() core function.
There is one other setting within the Media Settings Screen. This option, Organize my uploads into month- and year-based folders, allows you to select whether your wp-content/uploads folder will be broken down into sub-directories for the year and month the media was uploaded or just leave all uploads in a single level directory.
Permalinks Settings
Permalinks are the links for your posts. Typically you don’t want your URLs to change. You want them to be permanent. See what they did there?
The Permalinks Settings page allows you to pretty them up and make them human readable. Instead of domain.com/?p=234, you can get domain.com/my-awesome-post. In the past WordPress defaulted to the plain ?p=[post id] example. Now days a new WordPress install is going to come set with Post name selected.
There’s a few presets you can choose from. Simply switch to the format you want to use and click Save Changes at the bottom of the page and WordPress will handle the rest. But choose early. You don’t want to change this after you’ve got links out to your posts or Google has indexed them. If you switch and someone navigates to an old link they could hit the dreaded 404 page. No one wants that.
If you want to get a bit more funky with your permalink structure there are tags available for setting a custom structure.
On the Permalinks Settings Screen you can also change the slug used for category and tag links. For example, if you prefer your category archive for a certain term shows as domain.com/topic/category-name instead of domain.com/category/category-name, you can set the Category base as “topic” and save the changes. The same applies for tags.
There are a whole host of options available in WordPress for more advanced customizations.

Custom Settings Screens
That is it. That is all there is for the Settings Screens. Until you install some plugins. And then they may add their own host of Settings Screens to your site. And a lot of plugins will. If you’re looking for where you should setup a new plugin, under the Settings menu is a good place to start. If of course it doesn’t add its own menu item entirely.
Ok, now that is really it for Settings.
