WordPress’s built in responsive images are a powerful tool for serving up images at the proper dimensions based on the user’s screen size. This can go a long way toward improving your site speed and increasing your Google PageSpeed Insights score. Which grows more important as Google takes site speed into acconut for their page rankings.
WordPress handles outputting the responsive image markup for images called with the_post_thumbnail or output from the content editor. But WordPress won’t catch images output on the page with Advanced Custom Fields the_field function. Fret not though, we can do it easily.
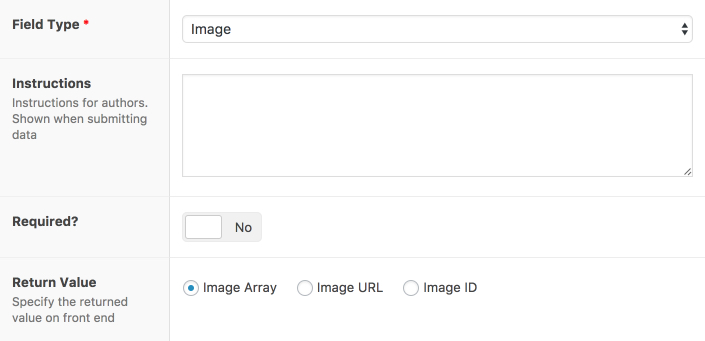
Setting up your Custom Field
First, we’ll need to create a field with a Field Type of Image. I’m going to go ahead and make the Field Label for mine Responsive Image, which will autogenerate a Field Name of responsive_image. If you’re not familiar with Advanced Custom Fields check out my introudction article.
In order to get the data we need from Advanced Custom Fields we’ll need to make sure our Image Field Type has a Return Value of either Image Array or Image ID. I typically always use Image Array is it gives you the most data, but for this Image ID will work just as well since WordPress will be handling the markup output. So let’s go with Image ID.
Creating the Image Markup
WordPress is going to handle the heavy lifting of getting out responsive image markup through the function wp_get_attachment_image. We just need to call that function on our ACF data, and WordPress will handle the rest.
Next, we’re going to store our custom field data in a variable using the get_field function. Then use that to pass our attachment (image) ID to the wp_get_attachment_image function along with our chosen image size. That looks like this if we’re using a Return Value of Image ID.
<?php
	// Outputting an image using Image ID as the Return Value
	$neat_responsive_image_id = get_field('responsive_image');
	echo wp_get_attachment_image( $neat_responsive_image_, 'full' );
?>
And this if we use a Return Value of Image Array.
<?php
	// Outputting an image using Image Array as the Return Value
	$neat_responsive_image_array = get_field('responsive_image');
	echo wp_get_attachment_image( $neat_responsive_image_array['id'], 'full' );
?>
Adding Classes
A lot of times we’ll be using custom classes on images inserted with Advanced Custom Fields, but we can easily handle that as well. If we wanted to add a class of bio-image to our output all we’d need to do is change our code to use the $attr parameter in the wp_get_attachment_image function to set the class attribute. That can done like so:
<?php
	// Adding a custom class to responsive image markups
	$neat_responsive_image_id = get_field('responsive_image');
	echo wp_get_attachment_image( $neat_responsive_image_id, 'full', false, array( 'class' => 'bio-image' ) );
?>
The third parameter in that example that is set to false is for $icon, which allows for you to determine whether the image should be treated as an icon.
Making it Work with Lazy Load Plugins
One other consideration may be that you want your image to be lazy loaded. Plugins like BJ Lazy Load can handle this, but rely on the_content filter to find images on your page. Our image isn’t running through the_content filter, so that presents a problem.
Luckily we can apply the_content filter to our output with a handy WordPress hook.
<?php
	// Applying the_content filter to our image markup to work with BJ Lazy Load plugin
	$neat_responsive_image_id = get_field('responsive_image');
	$neat_responsive_image_markup = wp_get_attachment_image( $neat_responsive_image_id, 'full', false, array( 'class' => 'bio-image' ) );
	echo apply_filters( 'the_content', $neat_responsive_image_markup );
?>
That is it. Any questions or suggestions on a better way to handle something? Let me know in the comments.
