One of the best ways to improve your code is to stick to a good set of standards. Following coding standards will make your code easier for others to understand and contribute to.
WordPress Coding Standards
If you’re going to be contributing to WordPress in anyway, whether it is developing themes, plugins, or core features, you’ll need to follow the WordPress Coding Standards.
The spec covers things like single versus double quotes, indentation, spaces, yoda condition, and more.
You can definitely familiarize yourself with the full handbook. And try to remember the rules as you develop. You can also setup a PHP codesniffer in Visual Studio Code to check your code as you write it.
Setting Up PHP Code Sniffing in Visual Studio Code
Note: This guide is for setting up PHP Code Sniffing on a Mac.
The first thing to do is install the php-code-sniffer package via brew. If you already have brew installed open Terminal and run brew install php-code-sniffer.
Setting up PHP Validation in Visual Studio Code
Next you need to setup PHP validation in Visual Studio Code. First you need to get the the path PHP is executing at on your machine. Run which php in terminal and copy the path the command outputs. It should be something like /usr/bin/php.
With this in hand we need to adjust the PHP settings in Visual Studio Code. In Visual Studio Code select Code > Preferences > Settings. You’ll want to check the following settings:
- PHP > Suggest: Basic should be checked.
- PHP > Validate: Enable should be checked
- PHP > Validate: Run is up to you. I prefer onSave so it isn’t running the entire time I’m typing. But if you prefer the latter set it to onType.
- The last setting is the PHP > Validate: Executable Path. To set this you’ll need to click Edit in settings.json. In your settings.json you’ll set the
"php.validate.executablePath": "/usr/bin/php",value to match your path from runningwhich phpearlier.
When all is said and done in your settings.json you should have the following items.
"php.suggest.basic": true,
"php.validate.executablePath": "/usr/bin/php",
"php.validate.run": "onSave",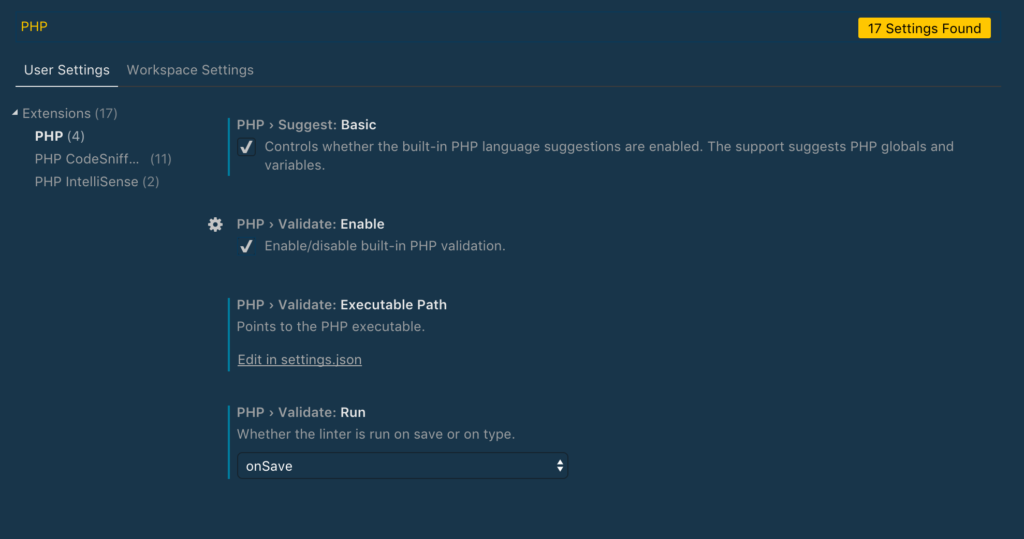
Adding PHP CodeSniffer to Visual Studio Code
You’ll need to give Visual Studio Code the ability to sniff your PHP code. To do that you’ll need to install the phpcs extension. You can do so from the marketplace or within Visual Studio Code. I have liked the Ioannis Kappas so that’s what this is based on.
We’ll follow-up on configuring the codesniffer in a minute.
Defining the WordPress Coding Standards
First we need to download the WordPress Coding Standards from Github1. And if you’re using _s for theme development you’ll want PHPCompatibility too. As it has a configuration making use of both.
You’ll need to clone the WordPress Coding Standards and PHPCompatibility from Github. Make note of the path you install them too as that will be needed for the configuration. I prefer storing them in my /sites directory.
Setting the Paths for Code Sniffing
Those paths I mentioned above, you’re going to use them here. You need to configure phpcs to know where to look for the
Danger! Before you set the path for your code sniffing make sure to open Terminal and run phpcs --config-show. This will give you something like installed_paths: /path/to/WordPress-Coding-Standards, /path/to/PHPCompatibility. Only if you have any installed_paths set already. The reason I bring this up now is the next command will overwrite any that are set. So if you do have some set already make sure to copy those paths as well.
Once you have the all the paths for the WordPress Coding Standards and PHPCompatibility repos as well as any paths already set in your installed paths command you can run it with phpcs --config-set installed_paths /path/to/WordPress-Coding-Standards,/path/to/PHPCompatibility.
Warning: ⚠️ The installed_paths command overwrites any previously set installed_paths. If you have previously set installed_paths for other external standards, run phpcs –config-show first and then run the installed_paths command with all the paths you need separated by comma’s, i.e.:
phpcs --config-set installed_paths /path/1,/path/2,/path/3
Configuring phpcs in Visual Studio Code
Now that phpcs in our system knows where to find our coding standard rulesets we need to configure things in Visual Studio Code.
Before we set things up we need to get the path to phpcs in our system. That can be done by running which phpcs.
It’s easiest to configure things directly within settings.json for this bit. If you go to Code > Preferences > Settings and click the {} icon VS Code will open the settings.json.
Inside settings.json you’ll want to set up the following values in your settings.json.
"phpcs.enable": true,
"phpcs.executablePath": "/usr/local/bin/phpcs",
"phpcs.standard": "WordPress"
We enable phpcs and set our standard ruleset to use WordPress. Then we’re setting the path to our phpcs from our which phpcs command earlier.
Let’s break that down.
