As users shift to mobile devices, page speed is becoming more and more important. Sure your site may look spiffy with all those JavaScript animations and background videos, but at what cost? Time to get existential, does a background video even exist if no user sticks around to load it? Woah.

If a lovely user experience isn’t enough to spur you to action, perhaps a nice hot cattle prod from Google in the form of SEO rankings will get you moving.
Google is going to look at page speed as a ranking factor for search result. That means if you want to stay on the front page you better load quick enough to keep the Google bot interested before heading back to Facebook. Not even the Google bot uses Google+.
WordPress’s Page Speed Battle
WordPress does a lot of things great. It’s free. It’s open source. It has a low barrier to entry for both users and developers. There are tons of themes and plugins available to fit any need. However, site speed is not something it does great.
But it can!
Like many other features with WordPress it just takes a little know how to get the best page speed results with your WordPress site. First, we need to measure where our site is slow so we can get the best page speed improvement for the buck. The buck in this case being your time and effort.
WordPress Page Speed Testing Tools
There are tons of tools for measuring site speed. And they all measure in various ways giving you various grades. I know this article may be titled about Google Page Speed Insights1, but it isn’t the only tool you should use. Why not? Here’s an example straight out of the Google PageSpeed Insights FAQ.
PageSpeed Insights’ analysis does not use real devices. Google fetches a site with a blink renderer (the rendering engine that powers Chrome) that emulates both mobile device and desktop devices.
Google PageSpeed insights does not render on real world devices. So it may not 100% accurately reflect a real world user’s experience. Hence the redundancy of testing across multiple tools.
Google PageSpeed Insights
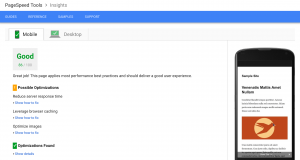
Despite not using real world devices, PageSpeed Insights still does a good job of getting mobile recommendations. Google takes into account factors like mobile devices having less powerful CPUs and favors those items more in their mobile analysis compared to desktop analysis. For example, JavaScript parsing uses more CPU so suggestions to fix that will be more prominent on the mobile test.
The mobile test gives you two scores on Google PageSpeed Insights, one for mobile and one for desktop. The numbers will vary.
PageSpeed Insights is one of the only tools that does focus on mobile results. So that is definitely a plus in it’s column. PageSpeed Insights does not give you a look at the total page size, load time, or a waterfall showing your assets loading.
PageSpeed Insights can be one of the more difficult tests to please as well. Which is why it will be the focus of our efforts. But don’t fret if you can’t get to 100. As long as you’re loading reasonably fast and getting high scores your users will be happy.
GT Metrix
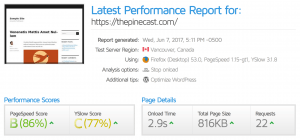
GT Metrix actually runs two tests on your site giving you scores from Yslow and PageSpeed. Yes, that PageSpeed. Kind of.
GT Metrix is accessing your PageSpeed Insights score via the PageSpeed Insights SDK. The difference being that Google has since updated the scoring and recommendations on the Google PageSpeed Insights online tool, but not within the SDK.
One thing you get with GT Metrix over PageSpeed Insights is the ability to create an account and save old tests and compare URLs. This is super useful if you’re testing different server configurations or putting together an article on page speed improvements.
The results also give you a nice big display of your total page size, number of requests, and either an onload time or a fully loaded time. Here’s how GT Metrix differentiates the two:
Onload time – is when the processing of the page is complete and all the resources on the page (images, CSS, etc.) have finished downloading.
Fully loaded time – is the point after the Onload event fires and there has been no network activity for 2 seconds.
Your score will default to fully loaded and you’ll need to setup an account to switch to onload. More details on the two can be found in the GT Metrix FAQ.
WebPageTest.org
If you want detailed results WebPageTest is the way to go. The project (also by Google) is being actively developed on GitHub, and had commits 14 hours ago as I wrote this article.
WebPageTest really shines in the reports you get based on your test. If you’re a big fan of charts and graphs this may be your tool of choice. Their request details are also very useful for double checking your render blocking scripts against PageSpeed Insights with a color coded table showing all your requests in order.
Page Weight by Imgix
Imgix released a nice tool that’s useful for seeing how your images are contributing to your page weight. It has a really nice interface for showing you which of your images could benefit from optimization. It just so happens they also have an image optimization tool they sell. Quite the coincidence. 😉
Common Causes of Slow WordPress Sites
Like any sturdy structure building a fast WordPress sites starts with a solid foundation. If you want to hit 100/100, you need to make sure you’re picking a good theme to start with and good plugins to add features. Done the right way they’ll work wonders. Don’t fear though. The tips were about to cover will immensely improve most sites. You just may hit the point of diminishing returns before that glorious 100 out of 100.
Let’s take a look at some of the common causes of slow WordPress sites.
Huge Images
Images can blow up your site speed in a hurry. Let’s say you found the perfect image for your site from unsplash.com. It’s a big, beautiful 4000×2000 pixel image with a cabin in the woods reflecting on a lake. So you download it, drop it in the Media Uploader, and add it as your post featured image. Giant full-width images are in now too. If your theme developer was lazy and just pulled in the full size image suddenly you have a 4mb image being loaded on your page. Almost single-handedly doubling the 2.3ish mb average for website2.
They certainly look pretty, but they can wreck your site’s speed.
Too Many Scripts
Once you have your images optimized the next biggest chunk of your site is likely going to be your Javascript. Particularly if you use any third-party services. The bulk of JavaScript bloat typically comes from third-party scripts and fancy animations.
Tracking scripts are the biggest culprit. Everything you put on your site wants to track your users. You need Facebook Pixels to track conversions, Google Analytics to track visitors, Salesforce tracking scripts, Marketo tracking scripts, and on and on. Add enough of tracking and throw in some neat parallax background videos and you can track your users “Nope” right out of your site.

Over Styling
There is such a thing as going a too crazy with a web site’s design. Parallax is the big buzzy word that no one uses properly3.
Choosing your own fonts is can pile up too. You probably don’t really need 8 weights of Roboto, 5 weights of Montserrat, and, you know what, let’s throw in 1 weight of Proxima Nova because it looks great for those tiny tag labels. Instead you could even *gasp* go with the system fonts. Apple and Windows have some pretty highly paid designers developing their system fonts. They’re pretty nice.
Also, if you’re a designer, and this a developer pet peeve of mine, make sure all the fonts in your design are available from 1 web service. Don’t go mixing TypeKit with Google Fonts unless you’ll be providing the actual font files.
Lots of transparency, overlapping images, and textures can certainly look good too. But they can also certainly blow up a site’s page weight in a hurry. Use sparingly. If you do it, make sure it is in a way that can be recreated on the web at a low page weight cost.
Most Common Google PageSpeed Issues for WordPress
Minification + Concatenation
Before we begin a let’s break down those terms.
Minification refers to the process of removing unnecessary or redundant data without affecting how the resource is processed by the browser – Google PageSpeed Insights

Or to put it more simply, magnification strips out a lot of the formatting that makes the code human-readable. Well, developer-readable at least.
Concatenation on the other hand refers to combining multiple files into 1 single file. So instead of 5 files the user’s browser only has to request 1 file. This is going to be less of a necessity with the advent of HTTP/2. But if Google is still recommending it, we’re going to cover it.
WordPress is great. The WordPress community creates an amazing ecosystem for allowing anyone with an internet connection and some know-how to create an endless supply of tools for WordPress. But that also means WordPress needs to be flexible, which can lead to some issues for WordPress page speed.
One of those issues is with enqueuing and concatenating scripts. To properly add a script to a site, a WordPress developer should be using the `wp_enqueue_script` function. This allows developers to name their scripts and helps prevent things like your site loading two versions of jQuery from two different plugins.
Skip to fix:
Autoptimize
Render Blocking Scripts
Render blocking scripts are any script that the browser determines must be downloaded before the page can be viewed by a user.
Scripts added in the head element will typically block rendering of the above the fold content. Scripts in the footer that aren’t loaded asynchronously or deferred until the page is fully loaded will also block rendering.
Often plugins and themes will have features that rely on JavaScript. Scripts that aren’t properly inserted to the page will block the page render as well. Even plugins with the scripts properly enqueued can cause issues if the browser decides it is render blocking. I’ve had JetPack’s devicepx.js used for the site stats feature show up as a render blocking script in PageSpeed Insights before.
Concatenating the enqueued scripts on your WordPress site will help reduce the number of files that are required for a user to load your page. You can also add `async` or `defer` attributes to your script elements. Even lazy loading can help prevent 3rd party scripts for things like YouTube embeds below the fold from blocking your site rendering.
Skip to fix:
Autoptimize
Async and Defer Attributes
BJ Lazy Load
Prioritize Visible Content
Prioritizing visible content means your WordPress site is loading only the scripts, styles, and images absolutely necessary to display the immediately visible portion of your site to users.
Inlining the CSS necessary to load the top portion of your page on both desktop and mobile while keeping the remaining CSS in a separate file solves this. We’ll cover a quick4 solution for this with Autoptimize.
Lazy loading can also help with this by holding off the load of additional images below the fold until a user has started to scroll your page in order to access them.
Skip to fix:
Autoptimize
Critical CSS bookmarklet
BJ Lazy Load
Optimize Your Images
Image optimization can have a huge impact on your site speed. Optimization refers to serving images that are properly sized for how they are displayed. That means not serving a 4000px wide image into a 500px wide space on the site. WordPress can help with this using custom thumbnail sizes, but that will depend on the theme’s or plugin’s implementation. Your best bet is to crop the image yourself before uploading. Cropping will also save you space on your server, because the full-size image and all of the cropped sizes will be saved.
Image optimization also refers to removing image metadata from images like the information on the device used to take it, and also compressing the image. Unless you’re a photographer serving up full res images you can likely get away with a quality setting within the 60-80 range without noticing any real loss of quality.
Skip to Fix:
Image Optimization Plugins
Reducing Server Response Time
Fixing a lot of the above should help reduce your server response time. The smaller the page weight, the less the server has to pull and the quicker it responds to a user request. But there are a lot of factors that can lead to increased server load.
Outside of increasing the CPU and RAM of your hosting you can see pretty sizable increases in server response time by switching to PHP 7, implementing HTTP/2, and setting up browser caching.
Skip to Fix:
Caching
Custom Expire Headers
[optin-monster-shortcode id=”qf6nequxwxqevj1uijjw”]
Autoptomize

Autoptomize is a free plugin on WordPress.org that allows you to easily minify and concatenate your HTML, CSS, and JavaScript. You will get solid results with just the basic settings, but the real power comes in the advanced settings.
Checking the checkboxes to optimize the HTML, CSS, and JavaScript will get you the basics set up.
That’s going to compile all your CSS into a single CSS file. Well, actually it’s going to output 3 concatenated and minified CSS files. One for each of the 3 media types of all, screen, and print. Your user’s browser will decide which file they need based on the media/device they’re on.
It’s also going to compile your JavaScript into a single, minified JS file. JavaScript can be tricky. Once you turn this on you’ll want to run through your site an test out any JavaScript functionality to make sure it is working as expected. If it isn’t, don’t freak out yet. There’s a couple things we can try.
Debugging Minified JavaScript
If you came across something broken you have a couple options. First, you could try aggregating inline JS. This also picks up any JavaScript added directly into the HTML and adds it to the concatenated and minified file. However, this can cause some issues of it’s own.
In the past I had used this to fix an issue with Envira Gallery, but it caused an issue with Disqus. The issue with Disqus can then be solved by checking the Force JavaScript in head option, but that would make it render blocking, and we don’t want to do that. Luckily Envira Gallery patched the issue in an update.
Instead, you will most likely want to exclude a script that is breaking from the concatenation and minification process. In order to do that you’ll first need to determine which script is causing the problem. This can be tricky in a minified file. If you can’t determine the JavaScript file causing the error from your console you’ll need to do some digging to determine the source.
Identifying Broken JavaScript

If you know which theme or plugin functionality is broken you can go ahead and exclude the JS file in the Exclude scripts from Autoptimize section. When you have multiple JS files you may want to test them one at a time so you don’t end up loding more JS files than you have to.
If you don’t know which file is causing the issue you will want to install the Query Monitor plugin. Query Monitor allows you to see which JS files are being loaded on our broken page, and get the filename so we can exclude them.
To do this you will navigate to the page with the broken functionality. Hover the Query Monitor stats in the Admin Bar and select Scripts from the dropdown. You will then be able to see the names of all the scripts being loaded on your page, including the full source making it easy to determine which plugin is loading the script.
Once you have your JavaScript debugged we can move onto prioritizing the visible content on the site.
Inlining and Deferring CSS to Prioritize Visible Content
In order to prioritize the visible content of your site, Autoptimize can inline the CSS necessary to load your above the fold content and defer the loading of the main stylesheet until the page is rendered. This can greatly improve load time and your PageSpeed score.
Getting the CSS is the tricky part. The best way would be to pull all of the CSS needed to style any of the content a user sees on initial load and inline it directly in the page HTML. That isn’t really possible without editing your theme.
You can also go through your CSS file line by line and pull out the rules that are needed manually. But that is a time consuming task, especially if you didn’t develop the theme.
Quickly getting Above the Fold CSS
There is a quick way to generate your above the fold CSS, although it isn’t perfect. Paul Kinlan has developed a JavaScript bookmarklet that we can run from the console to quickly generate above the fold CSS.
To use it head over to the Github page and copy the code to your clipboard. You’ll then go to the home page of your site and open the inspector console. Open the Console tab5 and pass the bookmarklet code into the Console. Hit enter and your console will spit out a large block of CSS.
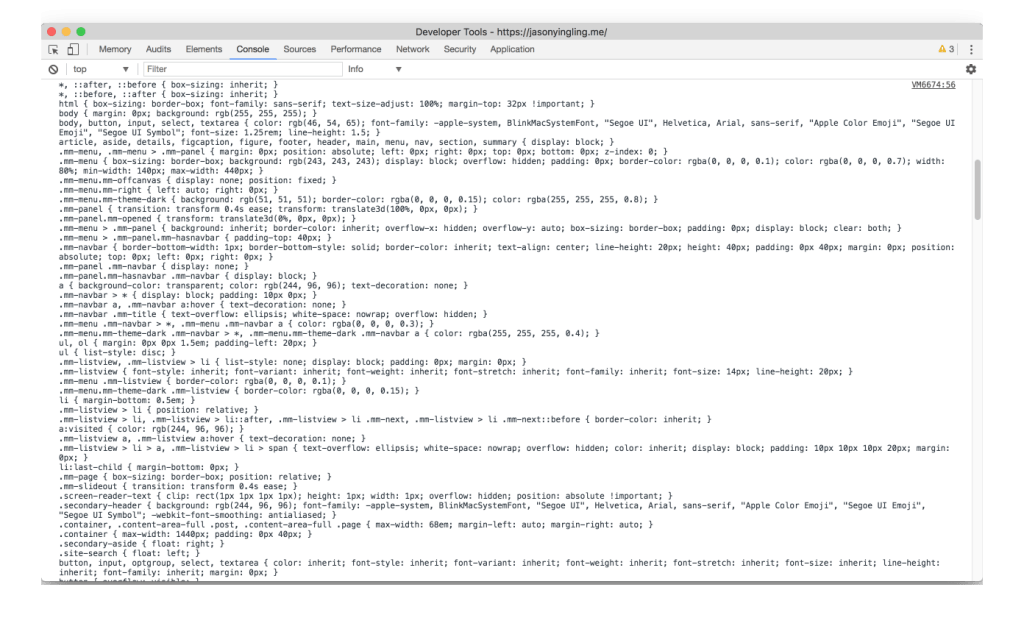
If you’re unsure how to access the inspector check out my PageSpeed Resources page under Developer Tools for accessing the tools in Chrome, Firefox, and Safari.
Now you can go back to Autoptimize, make sure the Inline and Defer CSS? is checked and paste the CSS into the text area. Doing so will add those styles directly into your HTML and then load the CSS after the page is rendered.
Issues with this method
1. It gets everything currently visible on the page. Using a social media plugin that adds icons after the page load, or even if you’re logged in to WordPress and the admin bar is displaying you’ll get the CSS styles related to those items.
2. It doesn’t get breakpoints. If your site design changes up responsively it won’t catch those. Meaning you’ll need to run the bookmarklet at various screen sizes to get everything or add those styles in manually. The problem with running it at different screen sizes is you’ll get duplicate styles that are unnecessary.
3. It duplicates styles already in your CSS. Even though these styles are being inlined they are still in your CSS file. This will lead to duplicate styles.
Inlining our CSS will give us a significant boost on PageSpeed Insights.
Next we’ll be setting up lazy loading for below the fold images.
BJ Lazy Load
The BJ Lazy Load plugin allows us to easily load in images and embeds as a user needs to see them. Rather than load in all of the images on the page at initial load, lazy loading allows us to load them in as a user starts scrolling towards them.
Activating the plugin is enough to get the images and embeds on your site lazy loading. But that is going to apply to above the fold images you don’t want to be lazy loaded. BJ Lazy Load gives you a field to exclude images with certain classes to fix this.
If your theme is using a WordPress custom logo you’ll probably want to add the `custom-logo` class to this list. Otherwise you’ll want to go to the inspector and see if your images that appear above the fold have a distinct class assigned to them.
In the case of my site my above the fold images didn’t have a specific class to differentiate from below the fold images. So to allow for excluding those images from lazy loaded I developed the following snippet to add a class to the featured image of the first post in the query.
/**
 * replaces the wp-post-image class with wp-post-image and theme_first_post on the featured image if the first post in the loop
 */
function theme_first_post_image($html) {

	global $wp_query;
    if( 0 == $wp_query->current_post ) {
   		$html = str_replace('wp-post-image', 'wp-post-image theme_first_post', $html);
    }

    return $html;
}
add_filter('post_thumbnail_html', 'theme_first_post_image', 100);
This function hooks into the output of the post thumbnail html and, if we’re at the first post in our query, replaces “wp-post-image” with “wp-post-image “my-first-post”. This function works for our main loop and for single post pages. In the case of my theme the featured image was the image above the fold. If your above the fold image isn’t a featured image you will need to edit your theme. If go that route make sure to do a child theme.
Optimizing Images
Image optimization is very easy to setup. Most of the plugins are going to give you free optimization to a certain point. Then you’ll need to go to a premium version or buy optimization credits. Here’s a few of the options.
Imagify – Imagify is my pick thanks to the combination of options, user interface, and 25mbs of images optimized for free. Each month. If you’re an average blogger you can probably get by for free. Their visual comparison tool is also nice if you’re unsure what level of optimization you should be using. They also do the best job of showing your optimization results, and allowing you reo restore originals or optimize to different levels per image. You can get a one-time 1 gb of image optimization for $9.99, or monthly plans starting at $4.99.
EWWW – EWWW has the most features of the image optimizers, but the UI is just blah. It’s great if you want to set everything up, but can be a bit confusing if you just want something to take care of it for you. 3,000 credits will cost you 9 bucks. They also offer monthly plans.
WP Smush – Smush Image Compression and Optimization on the repo, let’s you automatically optimize any image as it’s uploaded to your site. You can also “bulk smush” 50 images at a time with the free version. The Pro features are very nice, but come with a hefty price tag of $49 a month for a full WPMUDev license. Which does get you access to a lot of other plugins. But this article is keeping things cheap.
All of these plugins set up the same. Download it, activate it, sign up, and start optimizing. Although WP Smush skips the sign up part. With the plugin installed you can bulk optimize all of your old images and any newly uploaded images will be automatically optimized.
Caching Plugins
Caching can be simple or caching can be complex. Essentially caching generates static HTML files from your dynamic WordPress pages that aren’t changing very often and serves those up to the user. This tends to allow pages to load much faster.
Most hosts will have some form of caching solution built in to your site. WP Engine has caching (and a CDN) out of the box. You don’t have to do anything to set it up.
SiteGround on the other hand has tools built for caching WordPress sites that can be activated by a free WordPress plugin.
For those hosts that don’t have easy to setup caching tools you can look at WordPress caching plugins.
For a free tool that is easy to setup WP Super Cache is available on the WordPress.org repository from Automattic. Just download it, install, and activate. Then enable caching and you’ll start getting some benefits from caching.
Setting Custom Expire Headers and GZIP Compression
You’re most likely still going to be getting a suggestion to leverage browser caching. Even with caching plugins. Or if you don’t use a plugin you may need to manually setup caching. That can be done by dropping a line like follows into your .htaccess file.
## LEVERAGE BROWSER CACHING ##
<IfModule mod_expires.c>
ExpiresActive On
ExpiresByType image/png "access 1 week"
ExpiresDefault "access 2 days"
</IfModule>
## LEVERAGE BROWSER CACHING ##
The line to take a look at is `ExpiresByType image/png “access 1 week”`. This is setting up custom expire headers for PNG images to cache in the browser for 1 week.
You may also need to add the file type in your .htaccess in order to recognize it for caching. A font file will need to be added so it can be properly cached. This is done by adding the following line:
# Add correct content-type for fonts
AddType application/x-font-ttf .ttf
Then you’d add this line into the LEVERAGE BROWSER CACHING block above.
ExpiresByType application/x-font-ttf "access 1 week”For a full sample of a browser caching in the .htaccess check out this Gist.
Enabling GZIP compression is similar. You can drop the following block of code into your .htaccess and Bam! Gzip compression.
<ifModule mod_gzip.c>
mod_gzip_on Yes
mod_gzip_dechunk Yes
mod_gzip_item_include file .(html?|txt|css|js|php|pl)$
mod_gzip_item_include handler ^cgi-script$
mod_gzip_item_include mime ^text/.*
mod_gzip_item_include mime ^application/x-javascript.*
mod_gzip_item_exclude mime ^image/.*
mod_gzip_item_exclude rspheader ^Content-Encoding:.*gzip.*
</IfModule>
And of course in handy Gist form.
The End
Wow, this got a lot longer than intended. And it is only the beginning of what you can do to improve your Google PageSpeed Insights score and improve your site’s load time.
Keep an eye out for my PageSpeed Insights course on Skill Share soon. Finishing up recording the lessons on setup for each plugin. Or if you’d like sign up here and I’ll notify you once it’s live.
Improve Your Score
Now that you’ve finished the guide sign up to be notified the when the Skill Share course is ready. In the meantime check out the resources and slides from my 2017 WordCamp St. Louis presentation on the topic.
If these tips help you improve your score or you have any questions be sure to let me know in the comments.
- Google puts butts in the seats.
- Which is already high.
- Yes: The background and foreground move at different speeds. No: Elements animating onto a page.
- And not perfect, but passable.
- In Chrome you can do this by hitting the Esc key with the inspector open.
