Now that we’ve covered Posts and Pages we can move back up a spot on the Dashboard main navigation to Media. Also known as the Media Library, this is where WordPress stores all of the files you upload through the Media Uploader.
Let’s break that down a little bit.
Media
The term Media is pretty generic. In WordPress, Media, is actually a post of type Attachment. The post type holds data such as the description, name, and url of the file. It also allows the uploaded file to be tied to metadata stored in the wp_postmeta table. For file uploads like images that could include dimensions and EXIF data1.
One thing you’ll notice about Attachments is that the work area you land on is different than what you’ve seen for Posts and Pages. This area is called the Media Library.
The Media Library
When you first click on the Media navigation item you’ll land on the Media Library Grid View. This view of your Attachment posts requires Javascript to function properly. Essentially it shows you all of the images and files you’ve uploaded to your WordPress site in a nice thumbnail grid view. Switching to List view gives a layout closer to that of Posts and Pages, which just isn’t as useful for view images. Though it can help when scanning your images looking for a specific name.
The Media Uploader
In order to upload any new files to WordPress you’ll use the Media Uploader tool.
Click Add New on the Media work area and you’ll be presented with an area to drag and drop a file, or a button to browse your computer. Once you’ve selected a file and begun the upload process WordPress handles everything else, including cropping the image to predefined sizes set by themes, plugins, or the default WordPress image sizes.
Attachments can also be inserted on the individual Post editing pages through the Media Uploader. You’ll see a button for it right above your `the_content` WYSIWYG editor.
Any attachment uploaded through the Media Uploader is going to be stored within the “uploads” directory in your WordPress install. This can be found at the path “/wp-content/uploads”.
 Editing Attachment Information
Uploading attachments isn’t the only thing you can do from the Media Library. You’re also able to edit file meta information to make your site more accessible and edit the actual image’s dimensions or rotation.
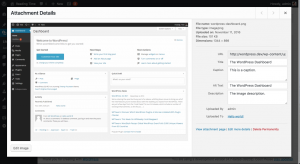
Attachment Details
Selecting an Attachment in the Media Library will open the Attachment Details panel. This panel will display information about the Attachment such as the file name, file type, date uploaded, file size, dimensions, and URL of the file on your server.
You can also edit the image title, caption, alt text, and description.
Title
The image title is descriptive text that provides additional information about the image. WordPress can use this data to sort images in the Media Library which makes searching for images easier on you once you have hundreds of images in your library.
Alt Text
The image’s alt text, or alternative text, is displayed when the image doesn’t load for a user. The alt text allows you to give information about what the image is for users that may be on a bad connection where images aren’t loading or maybe they have stopped images from loading. Screen readers will also use alt text to help visually impaired users navigate your site.
Caption
The caption can be used to display information directly below an image. This can be used to explain the image and provide detail to help the user understand what they are seeing.
Description
Since Attachments are a post type they can have their own single attachment page. The description allows you to enter any information you find relevant to the picture that you would like displayed on the attachment page.
Common Problems
Media Upload Size Limit
When uploading a new attachment you may notice a line that says something like “Maximum upload file size: 32 MB.” This upload file size limit will vary based on your hosting. For 90% of use cases the default limit on your server will be enough. However, it can be a bit of a problem if you’re uploading video or audio files. Even large images can be an issue, but if you’re uploading images larger than 1 MB and you aren’t a photographer offering full-size originals I would suggest you resize. That’s a lot of data to force on your poor user, especially on a mobile device.
There is a fix though. It involves editing your php.ini file or your .htaccess. If you’re not familiar with either it is best to contact your hosting provider and ask them to increase the upload size limit.
Shared hosting of any sort most likely won’t give access to edit your php.ini file, but if you do you’ll want to find the lines `upload_max_filesize` and `post_max_size` and increase them.
Don’t have access to your php.ini? You may be able to increase the file size through your .htaccess file. The .htaccess file is what WordPress uses to rewrite URLs when you have pretty permalinks on. Editing the .htaccess can be dangerous. I’ve taken many a site down by forgetting a single character in an .htaccess.
If you’re ok with the risk (you backed it up before editing, didn’t you?) you would want to add the lines `php_value upload_max_filesize 64M` and `php_value post_max_size 64M` replacing “64M” with your desired upload size in MB. Typically I put these at the bottom of the .htaccess outside of the WordPress section.
Permissions Errors
The always fun permissions error. These errors are great because WordPress really doesn’t give you any information as to what is happening. You may just get an “Upload failed” message. Fun!
This can typically happen if you’ve installed WordPress through FTP. Essentially the owner of the files is the FTP user instead of the server which causes the WordPress software to not be able to properly write files to the uploads directory. Some hosts provide an option to Reset File Permissions (WP Engine for example), other hosts you may have to contact, or if you have SSH / Terminal access you can run the following command:
`chown -R www-data:www-data /var/www/public_html`
In the example above “www-data:www-data” is setting the user and group (user:group). Www-data is commonly used for the server user:group, but you may need to check what your server uses. That is a bit more complex than we’ll be getting though. Also in the example “/var/www/public_html” is the root directory of the WordPress install. You’ll need to replace that with your server’s path to your WordPress install.
Hopefully now you have a better understanding on what exactly the WordPress Attachment post type is. Next we’ll move on to Comments.
- The bits of information stored in the image file, like location, time, and that fun stuff. We don’t need to get into that at all.
